Introduction: Why I Decided to Make My Own Fursuit
Making a fursuit was something I had dreamed about for a long time. Like many people in the furry fandom, I was fascinated by the creativity, craftsmanship, and self-expression behind fursuits. Buying a custom fursuit from a professional maker can be expensive, and while that option is absolutely worth it, I wanted to challenge myself and learn the art of fursuit making firsthand.
This blog is a detailed account of how I made my own fursuit, covering everything from planning and materials to mistakes, lessons learned, and final results. Whether you are a beginner, a DIY enthusiast, or someone curious about how fursuits are made, this guide will walk you through the entire process step by step.
What Is a Fursuit? (Quick Overview)
A fursuit is a custom-made costume that represents an anthropomorphic animal character, often based on a personal design known as a fursona. Fursuits can be partial or full-body and are widely used in conventions, performances, photoshoots, and social events within the furry fandom.
Understanding what a fursuit is and how it functions helped me plan my build more realistically.
Step 1: Designing My Fursona
Choosing the Character
The first step in making my fursuit was designing my character. I asked myself several important questions:
- What animal do I connect with the most?
- Do I want a cute, realistic, or cartoon-style look?
- Will this be a partial or full fursuit?
I settled on a character design that balanced expressiveness with simplicity. Since this was my first build, I avoided overly complex markings and color patterns.
Creating a Reference Sheet
I created a basic reference sheet showing:
- Front view
- Side view
- Color palette
- Eye shape and expression
This reference sheet became my roadmap throughout the entire fursuit-making process.
Step 2: Planning the Type of Fursuit
Before buying materials, I decided what kind of fursuit I wanted to make:
- Partial fursuit (head, paws, tail)
- Plantigrade full suit (human-shaped legs)
I chose a partial fursuit for my first project. It was more budget-friendly, less time-consuming, and easier to fix if mistakes happened.
Step 3: Gathering Materials and Tools
Materials I Used
Here is a list of the main materials I used to make my fursuit:
- Faux fur (high-quality, long pile)
- Upholstery foam
- EVA foam
- Hot glue sticks
- Contact cement
- Buckram mesh for eyes
- Acrylic paint
- Upholstery thread
- Lining fabric (lycra)
Tools
- Hot glue gun
- Scissors and craft knife
- Sewing machine
- Hand sewing needles
- Clippers for shaving fur
Choosing good-quality materials made a huge difference in the final look and durability of the fursuit.
Step 4: Making the Fursuit Head Base
Foam Head Base Method
I used the traditional foam head base method, which is beginner-friendly and affordable.
The process involved:
- Measuring my head
- Creating a foam bucket base
- Gluing foam pieces to shape the muzzle, cheeks, and brows
This stage required patience. I constantly tried the head base on to ensure comfort, visibility, and proper airflow.
Lessons Learned
- Symmetry is harder than it looks
- Less foam is better than too much
- Always test fit before gluing permanently
Step 5: Carving and Refining the Head Shape
Once the rough shape was complete, I carved the foam using scissors and a craft knife. This step transformed the bulky foam into a recognizable character.
I focused on:
- Smooth transitions
- Balanced proportions
- Clear eye openings
This was one of the most satisfying parts of making my fursuit because the character finally started to come alive.
Step 6: Creating the Eyes and Expression
The eyes define a fursuit’s personality. I used:
- Plastic mesh for visibility
- Acrylic paint for eye color
- Gloss finish for a lifelike shine
I experimented with eye shapes until I achieved an expression that looked friendly and expressive rather than aggressive or blank.
Step 7: Furring the Head
Patterning
I covered the foam head with duct tape and marked pattern lines. After removing the tape, I transferred the patterns onto faux fur.
Sewing and Gluing Fur
Each fur piece was sewn together and carefully glued onto the head base. I paid close attention to fur direction to maintain a natural flow.
Shaving and Trimming
Using electric clippers, I shaved areas like the muzzle and cheeks for a clean, professional look.
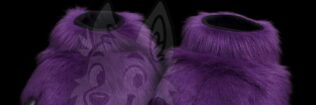
Step 8: Making the Fursuit Paws
Hand Paws
For the hand paws, I used a simple glove base and added foam padding for shape. I chose a four-finger cartoon style for comfort and ease of movement.
Paw Pads
I made paw pads using faux leather and hand-stitched them for durability.
Step 9: Making the Tail
The tail was constructed using foam and stuffed fabric. I added a belt loop attachment so it could be worn comfortably without slipping.
A well-balanced tail adds a lot of character to a fursuit and enhances movement during photos and performances.
Step 10: Lining and Comfort Features
Comfort is often overlooked by beginners. I added:
- Soft lining inside the head
- Breathable fabric around the face
- Extra padding for pressure points
Good lining makes a huge difference, especially during long wear sessions.
Step 11: Testing, Adjustments, and Fixes
After assembling everything, I tested the fursuit multiple times. I identified issues such as:
- Limited visibility
- Hot spots
- Loose seams
Each test helped me refine the suit and improve comfort and durability.
Step 12: Final Photoshoot and First Wear
Wearing my finished fursuit for the first time was unforgettable. All the hard work paid off when I saw the character fully come to life.
I took photos in natural lighting and shared my build journey with the furry community, which was incredibly supportive.
Common Mistakes I Made (So You Don’t Have To)
- Rushing the foam carving stage
- Buying cheap fur initially
- Underestimating the time required
- Skipping test fits
Learning from mistakes is part of the fursuit-making journey.
Ho Much Did It Cost to Make My Fursuit?
Here’s a rough cost breakdown:
- Faux fur: $150 – $300
- Foam and supplies: $100 – $200
- Tools and extras: $100+
Total cost: $400 – $700 (partial fursuit)
This was significantly cheaper than commissioning a custom suit, though it required a major time investment.
Is Making a Fursuit Worth It?
Making my own fursuit taught me valuable skills:
- Sewing
- Sculpting
- Pattern making
- Problem-solving
While it’s not easy, it’s incredibly rewarding. For many people, DIY fursuit making becomes a lifelong passion or even a business.
Final Thoughts
Making a fursuit from scratch is a challenging but deeply fulfilling experience. From designing a character to wearing the finished suit, every step reflects creativity, patience, and passion.
If you’re thinking about making your own fursuit, start small, learn from mistakes, and enjoy the process. Your first fursuit doesn’t have to be perfect—it just has to be yours.
Interested in a future guide on “How to Sell Custom Fursuits” or “Beginner Tools for Fursuit Makers”?